Projector Placement Mistakes That Quietly Reduce Picture Quality
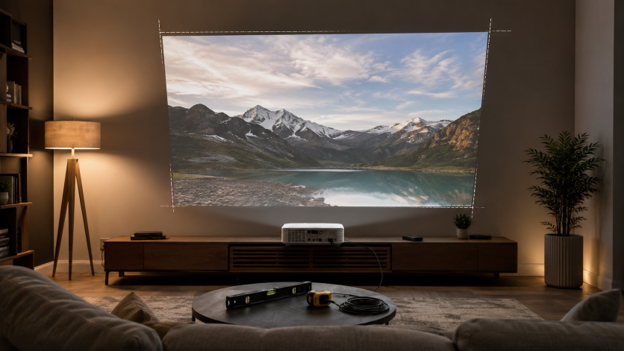
When a projected image looks slightly soft, uneven, or oddly shaped, people often reach for the settings menu. The underlying problem may be physical. A cabinet that is not level, a screen that is not flat, or an optical path that is a few inches off can quietly reduce quality long before color or contrast controls become relevant.
Placement deserves patient work because digital correction cannot fully replace proper geometry. The following mistakes are common, easy to overlook, and usually easier to prevent than to repair after cables and furniture are finalized.
Mistake 1: choosing image size before testing comfort
A wall may accommodate an enormous picture, but the seating may not. If viewers must move their eyes constantly or lift their heads, the screen will feel impressive for a trailer and tiring for a film. Mark several sizes with painter’s tape and watch familiar content from every regular seat. Include subtitles in the test.
In a room centered on a living room projector, size must also coexist with doors, switches, storage, and decor. Leave a calm border around the image and confirm that furniture will not obscure the lower edge. The usable wall is often smaller than the measured wall.
Mistake 2: relying on digital geometry correction too early
Keystone and corner controls are convenient, but they should not be the first response to a tilted or off-center installation. Digital correction reshapes the image within the available pixels and can reduce usable resolution or introduce scaling artifacts. Start by leveling the surface, squaring the screen, and positioning the lens according to the installation geometry.
Use a test grid, not a movie frame, for alignment. Check parallel edges, equal corners, and focus across the whole screen. Make one physical adjustment at a time. Once the image is mechanically sound, small electronic corrections can provide a final touch.
Mistake 3: treating the cabinet as decoration only
A projector cabinet must be stable, level, correctly sized, and ventilated. A beautiful surface that flexes when a drawer opens can shift alignment. An enclosed compartment can trap heat. A shallow top may force the device into an unintended position or leave cables bent tightly against the wall.
When positioning a laser home cinema projector, check the manufacturer’s placement and airflow requirements for the specific model. Measure the complete footprint with cables connected, and leave access for cleaning and service. Do not assume that a generic media console fits every optical design.
Mark the final feet position with discreet removable guides. After dusting or moving furniture, the projector can return to its calibrated location without repeating the alignment process.
Mistake 4: ignoring the screen plane
A screen that leans, bows, or twists will not share one clean plane with the projected image. The result can be uneven focus or geometry that seems impossible to correct. Check the frame with a level and view the surface under side light, which reveals waves and tension problems.
Wall texture matters too. Fine texture may be unobtrusive in casual viewing, while stronger patterns become visible in bright areas and subtitles. Test the actual wall before deciding that paint alone is sufficient. If a screen is chosen, ensure its material is appropriate for the projector position and ambient-light pattern.
Mistake 5: finalizing cables before the layout survives a week
Permanent cable routes can lock an untested arrangement in place. Begin with a neat temporary path secured away from feet and pets. Use the room for several days, including daytime and evening sessions. Notice whether a chair blocks the image, a drawer hits a cable, or a source device loses its network connection in the chosen cabinet.
Only then install channels or in-wall wiring. Label both ends, photograph the route, and leave service slack without loose loops. Keep power and low-voltage signal planning consistent with local electrical requirements, and use a qualified installer where needed.
Do the same delayed test with furniture. Live with the temporary cabinet position long enough to clean around it, open nearby doors, and host a normal gathering. A layout can be technically correct while making the room awkward to navigate. If the projector must be moved whenever guests arrive, alignment will never stay dependable. The right position supports both the optical requirements and ordinary household behavior, including the unglamorous routines that a quick installation test rarely captures.
Mistake 6: calibrating from only one seat
The center position may look excellent while side viewers see reflections, color shifts, or blocked subtitles. Walk the room during a test scene. Check focus, screen uniformity, sightlines, and sound from the seats people actually use. A small compromise at the center may create a much better shared experience.
Placement is not glamorous, but it is foundational. Accurate geometry, a stable surface, a flat screen, tested cable routes, and honest sightline checks allow the projector to perform without constant correction. Solve those quiet physical details first, and the settings menu becomes a place for refinement rather than rescue.
Check Placement After the Room Warms Up
Alignment should be reviewed after the projector and room have reached normal operating temperature. Materials can shift slightly as they warm, and a cabinet that seemed rigid during a quick setup may reveal vibration or movement during a full film. Recheck focus at the center and corners after an hour of varied viewing.
Use that longer session to observe human movement as well. People reach for drinks, adjust chairs, open drawers, and walk between rooms in ways a test pattern cannot show. If ordinary activity repeatedly disturbs the projector or crosses the optical path, the placement is technically possible but practically weak. Adjust the furniture or protection around the equipment before finalizing cables. A reliable installation must remain aligned not only in an empty room, but also while the room is being used as a home.
Keep the measurements and final position in a simple room note. Future cleaning, upgrades, or furniture changes will be faster when the proven geometry can be restored instead of rediscovered.