Our Olde House: June 2025

I have wanted to replace the floor in my bathroom ever since I had a new tile shower put in and I changed the wallpaper to match the shower tile. The existing floor was fine, but no longer a complementary color or pattern. Miss Sherry went with me to the hardware store and we found the perfect flooring, it looks almost exactly like the wallpaper. We bought two boxes of flooring which gives me one extra floor tile if my pattern and measurements are correct.
I decided to do a test to see if it was easy to install, and therefore something that I could do myself. I left the toilet and sink cabinet in place and started in front of the shower. I pulled up a few old tiles and put down a new one which really looked nice; this process did not seem to be too daunting so I decided to continue. Of course, the room is not just straight edges so some tiles need to be trimmed to fit in place. The old tile could be cut with heavy shears, but the new tile needs to be cut with a saw, and the edges interlock without any glue.
I pulled out all the tiles in front of the shower and continued putting down the new tiles; however the second new tile was a problem child that needed a cutout for a section of the shower wall and for the floor heat vent. After measuring, marking the tile, measuring again, adjusting the tile markings, and then making several trips outside to cut the tile with the saw, it fit. It took me one hour to fit the second tile; this may seem to be an excessive amount of time, mostly because it is, however I did not break anything or hurt myself, so for me this is a perfectly good outcome.
The remaining tiles in front of the shower were straightforward. I cut one tile in half so the edges would be staggered and the floor would be stronger, and I used a full tile to fill in toward the toilet. Many tiles need to be cut for length to fit into the space, and these cuts are easy, but there some more complicated cuts that need to be made around the doorway and under the toilet.
I decided to do the floor in the doorway and under the sink cabinet next, mostly to avoid removing the toilet which is more difficult, heavy and messy. I was very pleased that I cut a piece of flooring to fit the small triangle left open on one side of the doorway after fitting the large pieces. The other side of the doorway did not go well. After spending more than one hour measuring, marking and cutting the tile numerous times, the cutout for the doorway finally fit; however I had the tile backwards so it would not mate with the other new tiles. So much for my one extra floor tile.
I used the backward tile as a pattern on another tile, which I verified nine times that it was in the proper orientation before cutting it. That tile fit, and there were only three more tiles to install under where the sink cabinet would be, and none of them required any fancy cuts. After finishing all of these tiles, and since I made a rookie mistake cutting one tile incorrectly, I decided to take the next day off.
So far I have been working on the floor for three days, which for a professional would probably have taken three hours. At ‘this time in my life’ I can no longer work or bend over for more than a few minutes at a time, and that with lots of rest breaks. I hoped I could finish the floor in one more day; however, I may need another day to replace the toilet and sink cabinet that are vacationing in the sunroom.
Removing the toilet involves removing all of the water inside the toilet first, which is a surprising amount especially when poured on the floor. I sponged out the tank and plunged the toilet which left a little water in the toilet trap. I unbolted the toilet and removed it keeping it upright. It is not too heavy, but it is extremely awkward to hold on to.
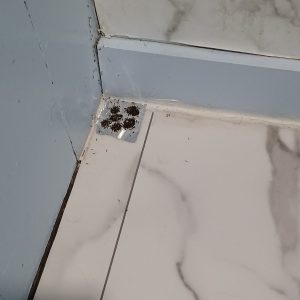
I laid the toilet on its back so the water in the trap would flow into the tank, where I removed it with a sponge. Three of the four remaining floor tiles needed part of a circle cut into them so the tiles would fit around the toilet flange. I used the hole in the old tiles that I just removed as a pattern, and this worked pretty well; since all of the circle and cuts will be under the toilet, ‘close enough’ will certainly do. I finished installing all of the floor tiles and quit for the day.
The last day of this project needed the toilet installed, the sink and cabinet installed, and all of the floor tile edges caulked. Miss Sherry helped me install the toilet by guiding it into the right position, and holding one of the toilet bolts while I held the other one, as I lowered the toilet into place. I reconnected the water and we did not have any leaks.
The sink and cabinet were put back in place. I attached the drain pipe and the hot and cold water lines, turned on the water; we did not have any leaks. I retrieved the bathroom items that I put in the other bathroom while this bathroom was indisposed. This project took longer than anticipated, but I did not hurt myself, I did not break anything, and no ladder was needed or damaged. I told Miss Sherry sweetly that I was not going to remodel this bathroom again, ever, even if there is a deep freeze way way down south.